
How to Effectively Use Power Automate Filter Query
Power Automate is a powerful tool for automating tasks, and one of its handy features is the filter query. This feature allows users to retrieve specific data from various sources, including SharePoint and SharePoint Online. In this article, we'll explore how to use filter queries in Power Automate without getting bogged down in technical jargon.
Understanding Power Automate's Filter Query
Before we dive into the practical steps, let's grasp the basics. Power Automate, formerly known as Microsoft Flow, empowers users to create automated workflows. The filter query acts as a search filter, enabling you to refine a large dataset and extract only the items that meet specific criteria.
Expression |
Description |
Example |
|---|---|---|
| eq | Equals | Category eq 'Electronics' |
| ne | Not equals | Status ne 'Inactive' |
| gt | Greater than | Price gt 50 |
| ge | Greater than or equal to | TotalAmount ge 100 |
| lt | Less than | Price lt 30 |
| le | Less than or equal to | Salary le 50000 |
| eq | Equals | Category eq 'Electronics' |
| startswith | Field starts with | startswith(Name, 'A') |
| endswith | Field ends with | endswith(Name, 'I') |
| substringof | Field contains the substring | substringof('Laptop', Name) |
| indexof | Name field contains the letter "X" at position 2 |
indexof(Name, 'X') eq 1 |
| replace | Replace field value | Replace(Name, 'xyz', 'abc') |
| substring | Returns Boolean value for string containing ‘ABC'. |
substring(ProductCode, 2) eq 'ABC' |
| tolower | Change Field to Lowercase | tolower(Name) |
| toupper | Change field to Uppercase | toupper(Name) |
| concat | Concatenate fields | concat(Brand, ' ', Model) |
A Step-by-Step Guide to Filter Queries
Here's a simplified step-by-step guide to using filter queries in Power Automate:
- Sign In: Begin by logging into Power Automate.

- Create a Flow: Click on "Create" in the menu.

- Choose Flow Type: Select "Instant Cloud Flow" from the available options.

- Name Your Flow: Provide a name for your flow and choose a trigger. The trigger determines when the flow will run; for instance, you can opt for "Manually trigger a flow".

- Create the Flow: Click "Create" to set up your flow.

- Add a New Step: In the next step, click "New step" to add a new action to your flow.

- Select "Get Items": Search for "Get items" and select this action.

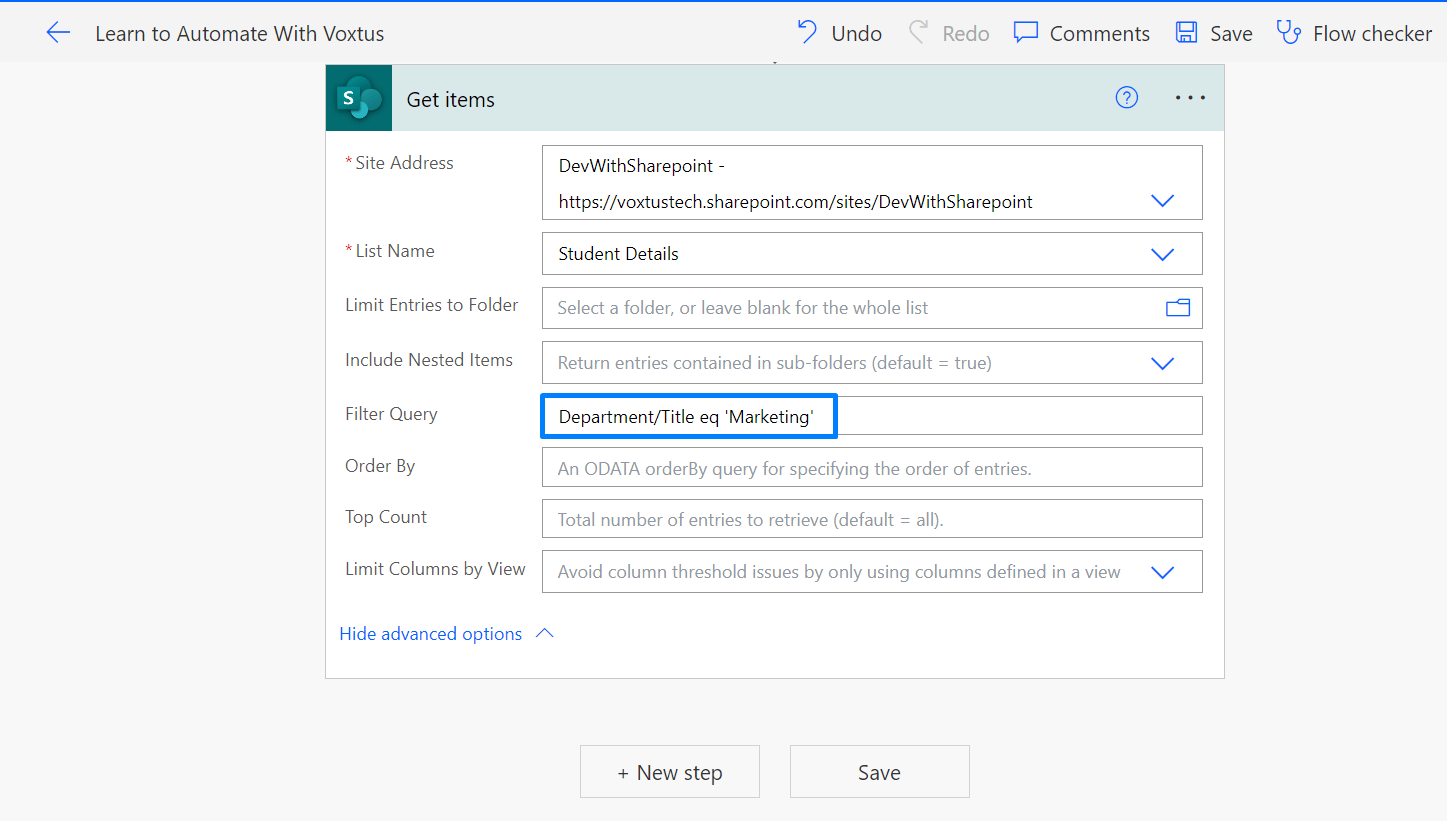
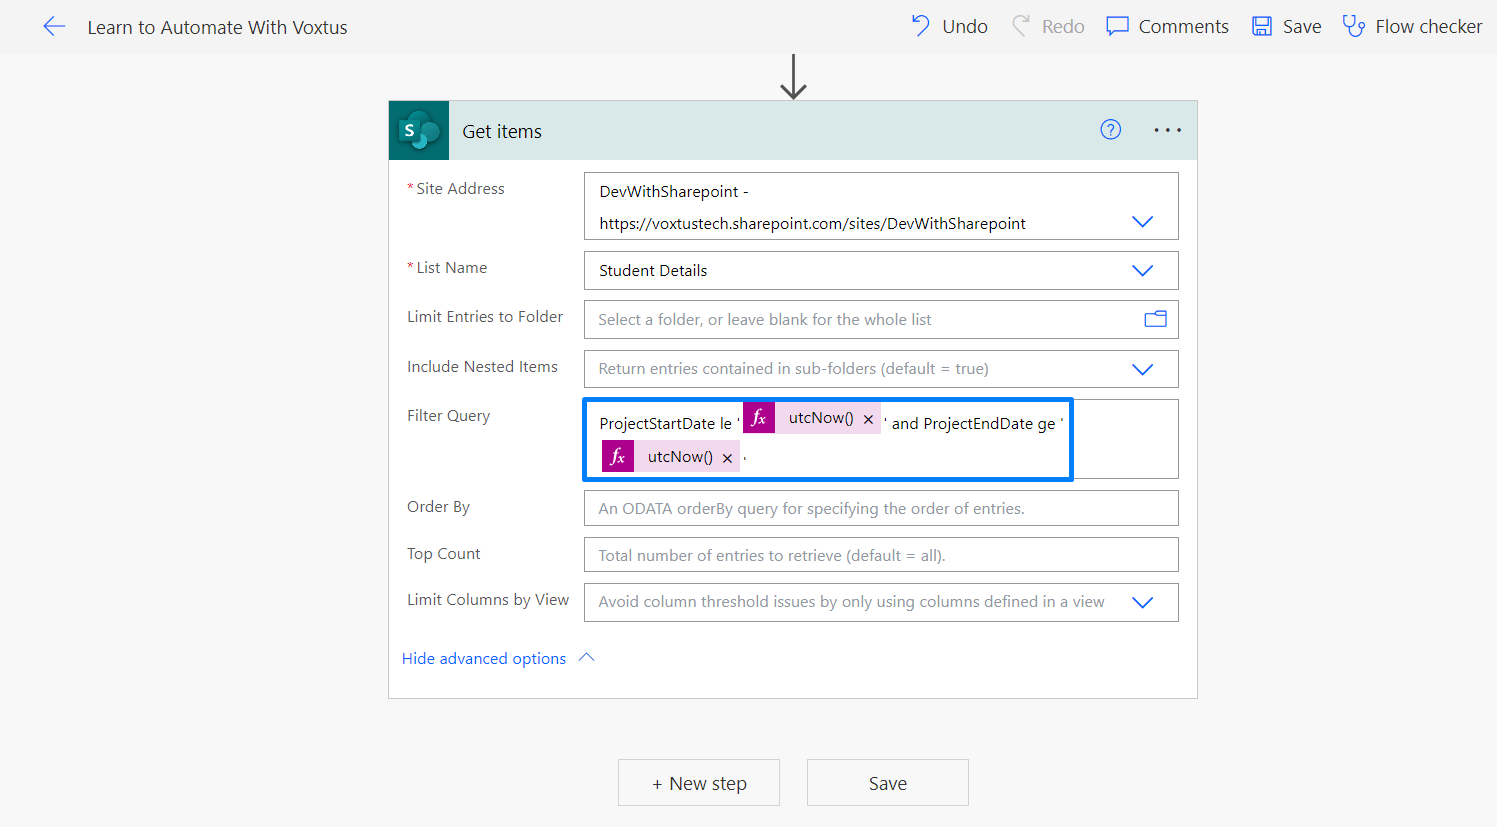
- Specify Site and List: In the "Site Address" field, select the SharePoint site, and in the "List Name" field, choose the list from which you want to fetch items.

- Utilize the Filter Query: In the final step, use the "Filter Query" field to define your filter conditions. This is where the magic happens.

Examples of Filter Queries in Action
Let's explore some straightforward examples to illustrate filter queries:
- Filter by Single field: If you have a list of Student Details and want to see only Students from particular "Location", use this filter query:

- Multiple Conditions: Suppose we have a "Class" column and a "FeeStatus" column and in Student Details. To fetch Students with Fee status with Due Status, use this filter query:

- Lookup Field: If you have a SharePoint list with a lookup field named "Department" and you want to retrieve items where the department is "Marketing", you can use the following example query:
- Filtering Date Fields: If you have a SharePoint list with date fields "ProjectStartDate" and "ProjectEndDate" and you want to fetch items where the project is currently ongoing (i.e., the ProjectStartDate is before or equal to today, and the ProjectEndDate is after or equal to today), you can use the following example query:
Note: The filter query should use the field's internal name. If the name contains spaces, replace them with 'x0020'.
Filter Query Tips
- You can use various operators like eq (equals), ne (not equals), gt (greater than), ge (greater than or equal to), lt (less than), and le (less than or equal to).
- Functions like startswith(Fieldname, 'string'), endswith(Fieldname, 'string'), and substringof('string', Fieldname) can be used for text fields.
- For date and time, functions like day(), month(), year(), hour(), minute(), second(), and now() are available.
Best Practices for Using Filter Queries in Power Automate
Filter queries in Power Automate can significantly enhance the performance and precision of your workflows, particularly when working with data sources like SharePoint. To make the most of this feature, it's essential to follow best practices. Here are some comprehensive guidelines to help you use filter queries effectively:
- Understand Data Types Thoroughly: Filter query behavior varies with different data types. For instance, text and choice fields require single quotes around the value, while number and Boolean fields do not. Familiarize yourself with the data types you're working with to apply filter queries correctly.
- Employ Logical Operators: Logical operators like “and” and “or” are your allies for combining multiple conditions in filter queries. Utilize these operators to create intricate filtering logic that matches your specific requirements.
- Leverage OData Functions: OData functions like startswith(), endswith(), and substringof() can be potent allies when crafting complex queries. These functions empower you to filter data with precision, so explore their usage for more refined filtering.
- ISO 8601 Format for Dates: When dealing with Date and Time columns, ensure your date values adhere to the ISO 8601 format (YYYY-MM-DD). This standardized format prevents date-related issues in your filter queries.
- Test Your Queries Vigorously: Always test your filter queries before deploying them in production workflows. Even a small syntax error can lead to unexpected results, so verify that your queries return the expected data.
Common Mistakes to Avoid
As you navigate the world of filter queries in Power Automate, watch out for these common pitfalls:
- Case Sensitivity Matters: Remember that Power Automate is case-sensitive when it comes to field names in OData queries. Ensure that your field names match exactly, including capitalization.
- SharePoint's Internal Field Names: SharePoint often assigns internal field names that differ from the field's display name. Ignoring this distinction can lead to filter queries not functioning as anticipated. Always use the correct internal field names.
- Quotes and Data Types: Misusing quotes can lead to issues in filter queries. Apply single quotes around text values and none around numerical or Boolean values. Failing to do so can result in errors.
- Proper Date Formats: Date fields should be formatted correctly in ISO 8601 style (YYYY-MM-DD) in your filter queries. Using an incorrect date format can cause your queries to yield unexpected results.
- Delegation Consideration: If your workflow involves processing a substantial volume of data, pay attention to delegation. Not all filter query operations can be delegated, so be cautious and check for delegation warnings.
- Special Character Escaping: When special characters are present in your filter query, ensure they are escaped correctly to prevent unexpected errors in your workflows.
By following these simplified guidelines, you can effectively use filter queries in Power Automate to streamline your workflows and get the data you need, all while keeping things simple and straightforward.
If you have any doubts or questions related to this blog, you can Contact us by Email: info@voxtus.com
Abhishek Kumar
Power Apps Consultant